Installation Forge
This page covers installing the Blender add-on and getting started. Modeling through Blender's UI does not require the MCP Server or the root development environment.
Requirements
| Purpose | Requirement |
|---|---|
| Use the Forge add-on | Windows, macOS, or Linux; supports Blender 4.5 LTS (4.5.6 or later in the 4.5 series) and Blender 5.2 LTS |
| Feature dependencies | Configure as needed; see Config Forge → Dependencies |
| Agent automation (optional) | uv on the agent side and a client supporting stdio MCP |
Basic familiarity with Blender is needed to use Forge.
1. Prepare the installation archive
Use a Forge ZIP matching the intended source version, or package addon/Forge from this checkout. The ZIP root should directly contain blender_manifest.toml, __init__.py, core/, ops/, and lib/. Do not install the entire repository as an add-on.
PowerShell example, run from the repository root:
git lfs pull
Compress-Archive -Path addon/Forge/* -DestinationPath Forge.zip -Force
git lfs pull retrieves the actual assets required by the add-on, including lib/assets/Shapes.blend. An existing complete installation archive does not need repackaging.
2. Install in Blender
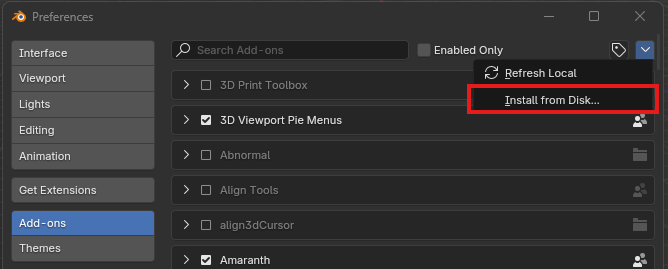
- Open Edit → Preferences → Add-ons → Install from Disk.
- Select and install the Forge ZIP.
- Search for Forge in the Add-ons list and ensure it is enabled.
- Return to the 3D View, press
Nto open the sidebar, and select the Forge tab.
After installation, configure feature dependencies as needed under Config Forge → Dependencies. Package purposes, PIP controls, installation steps, and restart requirements are documented there.
3. Check that modeling is available
- Create or open a Blender scene and enter Object Mode.
- Open the Forge sidebar and locate the creation and definition groups under Model Define.
- With nothing selected, click Create link(s), then create a Visual or Collider.
- Select an object and check its model data under Object Properties → Forge Properties.
Continue with the UI overview and recommended modeling workflow.
4. Connect an agent (optional)
Configure MCP when an agent needs to inspect or modify the scene:
- Enable Forge in the Blender instance that owns the scene.
- Start MCP Bridge from the Forge panel or settings. Its default address is
localhost:9876. - Follow the MCP installation guide to configure the agent-side server and client.
The MCP Server and Blender add-on are independent components with separate installation locations, startup steps, and dependencies.
Installation issues
| Symptom | Check |
|---|---|
| ZIP is not recognized | Package the contents of addon/Forge with blender_manifest.toml at the ZIP root |
| Forge tab is missing | Enable the add-on, use a 3D View, and press N to expand its sidebar |
| Shapes.blend or icons are missing | Fetch Git LFS assets, then repackage and reinstall |
| Dependency installation fails | See the dependency installation instructions |
| A button is disabled | Check Object Mode, model types, and selection count; see operator preconditions |
Read Development Forge when you are ready to modify the source.